
Plan ahead: Applying Brick Paver Sealers
Adding Paver Sealers – The Planning Process
Adding paver sealers can be very simple; however care should be taken with the prep work. Before beginning the paver-sealing process, follow the check points below to ensure the best possible application. These tips are specifically for Joint Stabilizing Sealer, Natural Look (Satin); however, most apply to other paver sealers as well.

In all cases, read your sealer manufacturer’s label, in full, before starting your project. Refer to the full application instructions included with the sealer.
-
Wait
until all pavers are free from efflorescence. This may take up to one full Outdoor Living season (a calendar year).
-
Clear
entire surface of all dust, debris, fallen leaves, Maple Tree helicopters…etc. Use a broom, and/or a leaf blower for best results.
-
Clean
with an appropriate paver cleaner for your installation.
What are you cleaning?-
- Efflorescence
Plant Stains
Oil/Grease Stains (on driveways, or near grills)
Existing sealer from a previous application
Rust Stains
Paint, Tar or Rubber
- Efflorescence
There is a cleaner for that!
-
-
Dry
surface and joint sand for a consistent application. Moisture from any source, including cleaning or rain, may affect the finished look and stabilizing ability.
- No rain while applying sealer, plus 24 hours for initial cure time.
- No high winds.
- No excessive heat or cold. Low 70’s + Low humidity = ideal.
- Dry time could be 30 minutes – 3 hours.
- Initial cure time (joint sand stabilization) for rain and vehicles is 24 hours. The full curing process will take extra time.
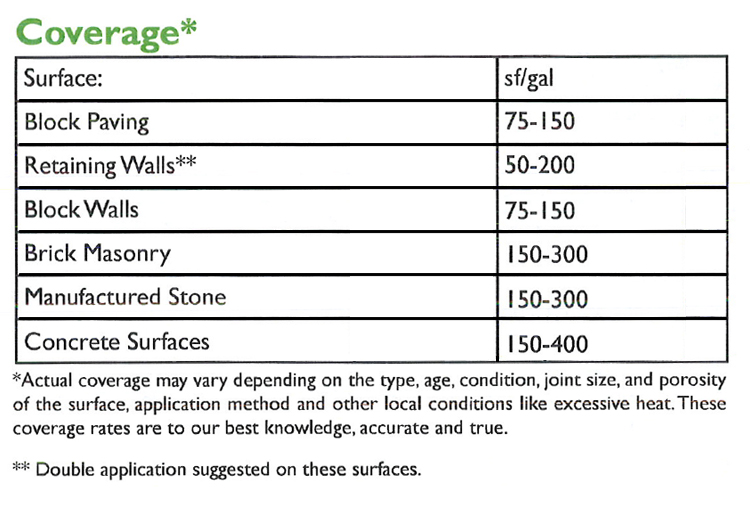
HELPFUL DOWNLOADS:
Sealer Coverage Chart
Natural Stabilizing Sealer
Enhancing Sealer
Wet-Look Stabilizing Sealer